Update: I have explained how to do this in my video on YouTube. The information written below covers the same things but has a bit more detail than I could fit into the video.
Ok, so in my previous post I wrote about a design I made for my own Filofax rings organiser. And now it’s time: I made it! I will share with you HOW I made my own Filofax in this blog post. Buckle up, it is going to be a long post, in part because of the many images.
Just as some advice: I am a fairly experienced sewer/sewist when it comes to fabrics having made around 200-250 garments, accessories, soft furnishings and fabric bags over the years. I also have some experience with garment-quality PVC/faux leather fabrics and a little experience with sewing vinyl (think: table ‘cloth’). This Filofax project isn’t too hard to get something decent, but I would say that due to the material I used, it might not be the greatest project for someone who has very little or no experience sewing. I used tarpaulin (the stuff that’s on the side of lorries) and when you sew it, the needle creates small holes. This means if you sew wrong and want to undo the stitching, you will still have those holes there (unlike with woven/knitted materials where undoing stitching leaves no permanent mark). There are some advantages to tarp, though, namely that it does not fray, it doesn’t warp or stretch, layers don’t slip and slide over each other, etc. So, in that sense it’s an easier material to use for this kind of project. If you were to use leather, you will have the same challenge of the needle making permanent holes. With leather you may have the additional challenge of it stretching slightly, possibly requiring you to use some kind of interfacing (please look online for tips on creating a leather organiser as a leather worker will know everything you will need to know).
Firstly, let’s look at the tools I used:
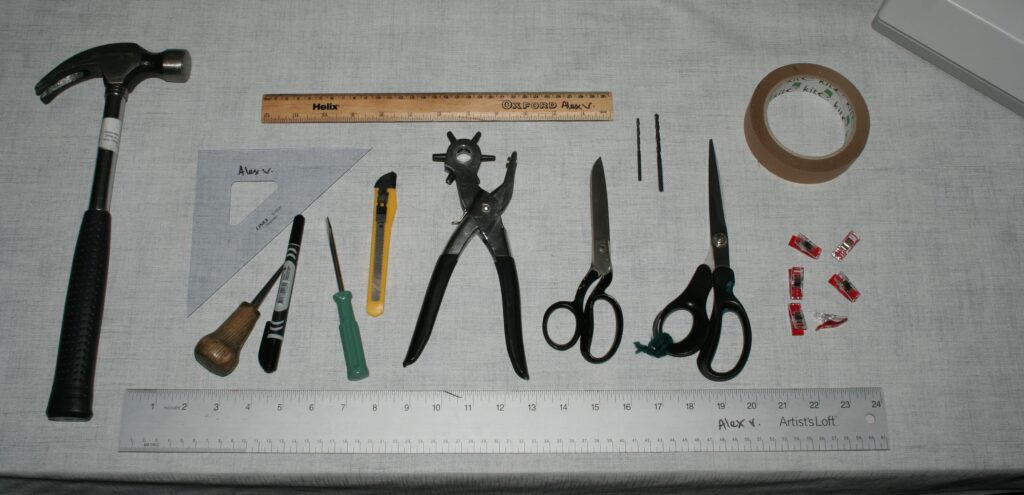
- Sewing machine (not fully pictured). I used a Singer Heavy Duty. I am not sure a lighter-weight domestic machine will be strong enough. It is possible to order a small sample tarp so you can try before you commit to buying a larger piece.
- Walking foot (not pictured) for my sewing machine. I first tried my regular foot using different settings for the top thread tension but the results were not super (the top thread kept being pulled down a little: it didn’t create loops but you could feel the little ‘nub’ of the top thread laying over the bottom thread).
- Thick sewing machine needle (not pictured). I think mine is size ’90’.
- Non-fabric scissors. You do not want to use your fabric scissors for anything other than fabric, so for tarp, use regular craft scissors. I did consider using a blade and metal ruler as it would be easier to create a straight cut, but I was worried the tarp would be too stiff to easily cut through. I will try using a blade on a scrap piece, though, before starting a future tarp project.
- Fabric scissors. Shown in the tools photo because I used them to cut thread. You can use any kind of scissors to cut thread, also regular craft scissors, so fabric scissors are not required for this project.
- Various drawing tools. Rulers and a set square.
- Permanent marker. Required to mark the tarp. Note that you should aim to draw on the ‘wrong’ side so that any marking still present on your pieces will be hidden on the inside. I used a regular ball-point pen to draw on paper (not shown).
- Screw driver (flat head). Required to remove and attach my walking foot, and for removing and attaching the screws of the ring mechanism. The one pictured came with one of my sewing machines.
- Hole punch pliers. I have accrued several of these over the years. They have several hole punches ranging in size from around 1 mm diameter to around 6 mm diameter. I use these with a small piece of card underneath the material as this makes it much easier to punch through your material and will hopefully also protect the sharp edge of the punch from going blunt.
- Awl going up to about at least 5 mm diameter. I used this to make the holes slightly larger.
- Small blade. Handy to cut off small excess bits in the drilled holes (when the awl is placed through the hole).
- Drill bits. I used 3 mm and 4 mm drill bits. I used a small MDF piece (not pictured) underneath my material as a ‘guard’ from drilling into my floor!
- (Paper) tape. To help keep pieces in place whilst sewing.
- Clips. To help keep pieces in place whilst sewing. Not required if you have tape.
- Drill. Required for drilling holes through your organiser needed for installing the ring mechanism as well as the popper studs (when put through the whole front panel).
- Vacuum cleaner. Used to remove from your organiser as much of the particles created during drilling.
And now onto the materials I used:
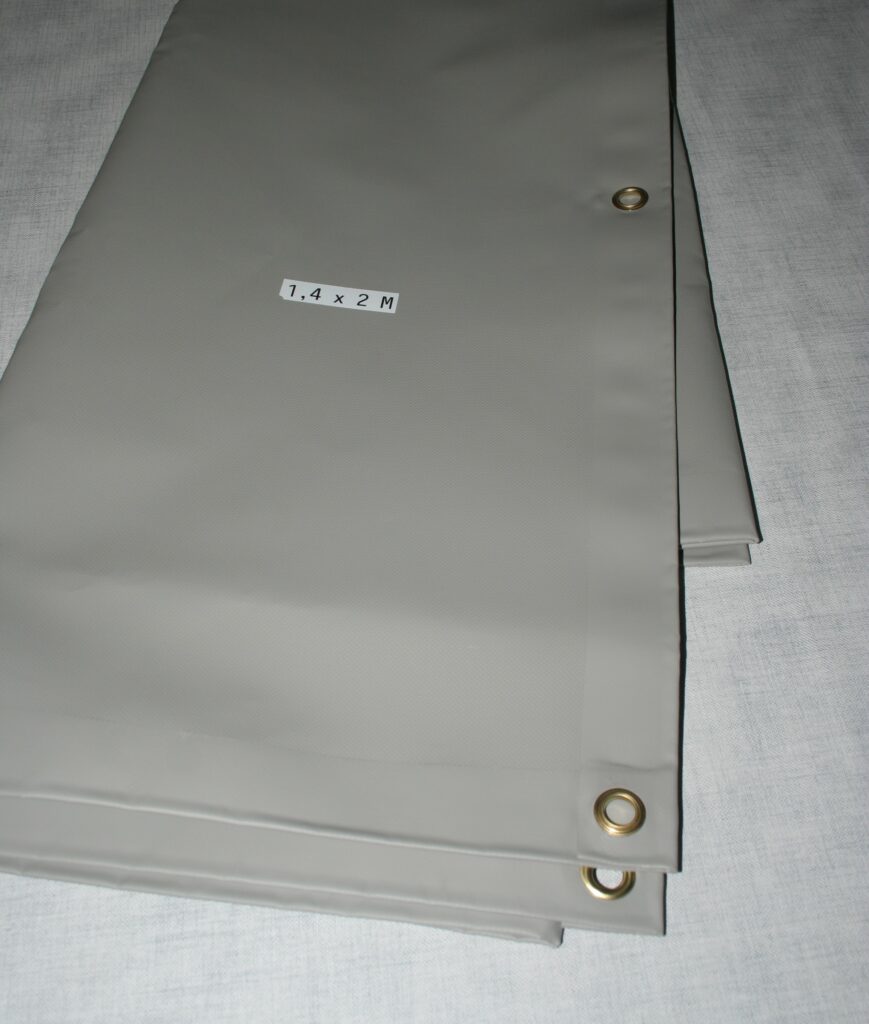
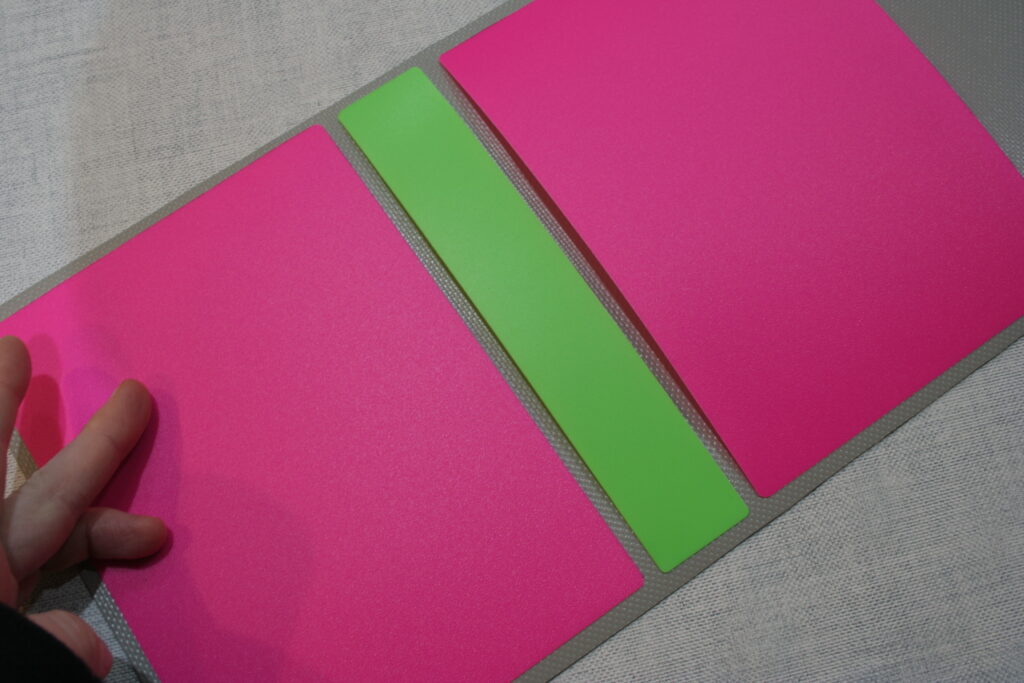
- Tarpaulin, also called tarp. I used heavy duty tarp that is 610 gsm in weight. I bought this on eBay and it comes in various colours. Note that if this is sold as a tarp for use in building/storage, they will have finished all edges of the tarp by folding over and gluing and inserting eyelets. I didn’t need this so next time after I place an order, I will ask if they can give me a piece of the material only without the edge finishings.
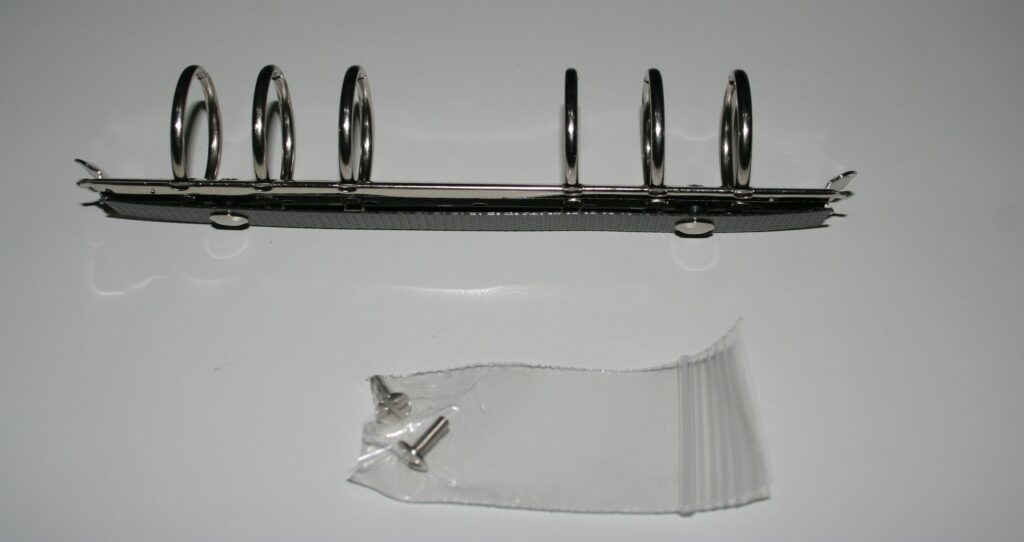
- Ring mechanism. I bought a silver colour system with 30 mm inner diameter rings, also from a seller on eBay. This was around £15, so not cheap. I saw them cheaper on AliExpress but after adding the one item on which they would give me a 90% discount as a new customer, I couldn’t add in any additional items even if I wanted to pay full price (around £4.50)… I also didn’t want to wait for ages or risk it not arriving, hence my decision to go with the eBay seller (who has great reviews) and order just one to see if I like it.
- Thread. I used Gutermann Denim thread (in colour: black). This is a thicker thread than regular sewing thread, and I think looks more in proportion when used on tarp. I hope it’s also stronger. I did try bonded nylon thread (used for leather) on a sample piece but I wasn’t that happy with it, although I might try again to see if I can get it right.
- Popper studs. I used Prym ‘Sport & Camping’ popper (press) studs in 15 mm diameter. These are stronger/heavier duty than the regular ones. They are awesome, but they would be too ‘hardcore’ for use in a single layer of most kinds of material or even for use in two or three layers of thin fabric. So, always consider the purpose before you order something like press studs. In my case, I knew the material for my organiser would be fairly thick/sturdy and the item will have to last a long time/withstand ‘heavy’ use (the strap being opened and closed hundreds of times if not more, over the years).
- Reinforcement. The tarp is heavy duty but still quite thin and ‘floppy’. In those respects it’s similar to thicker vinyl table cloths. This isn’t good for an organiser, hence my decision to reinforce the organiser cover. I used plastic material from spiral-bound notebooks I kept from my high school days. I am guessing this material is between 0.5 and 1 mm thick, and it can be cut with sturdy craft scissors. It does still bend somewhat but is overall quite sturdy. The colour doesn’t matter as it will be on the inside of the organiser between the outer shell and the lining/inner shell. If you were to use a very light colour for your outer shell and/or inner shell, you may need to find a transparent or lighter colour plastic reinforcement as darker reinforcement may ‘shine through’.
- Plain paper for your paper model.
Safety first! As you will be using a drill, consider using PPE:
- Goggles to protect your eyes from dust and plastic ‘shavings’.
- Ear plugs and/or ear defenders to protect your ears from the loud noise of the drill.
Now, let’s get into how I made this organiser!
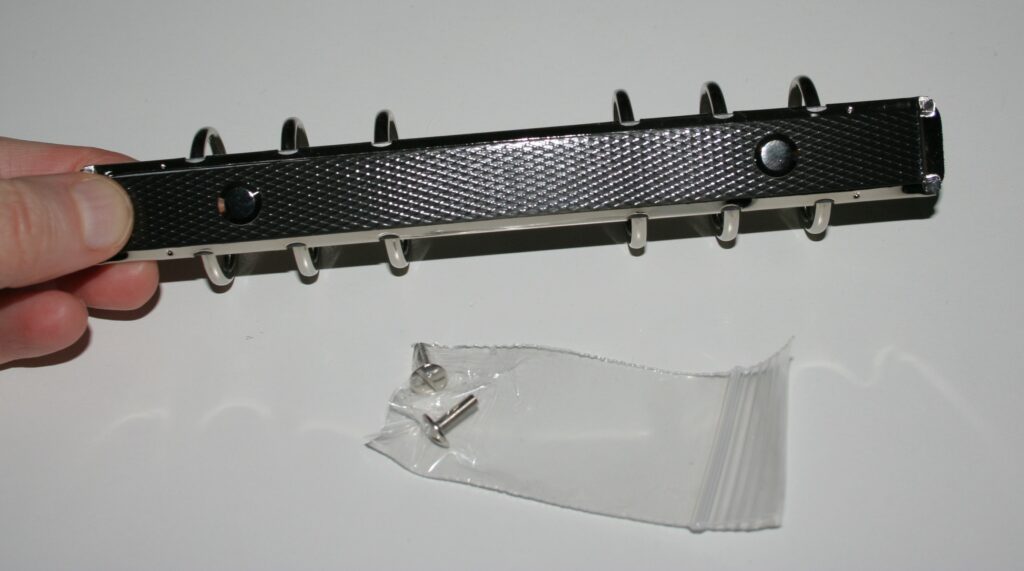
Firstly, I want to show you the ring mechanism I bought online. It’s a 30 mm internal diameter ring system for the Personal size. I specifically wanted this large size because I like to carry around a lot of junk with me in my Filofax. The order came with the rings, the screws (with two sets of male parts differing in length, I think to accommodate for different organiser cover thickness; note the shorter male parts are used in the system in the photo below, the longer ones are in the plastic baggie), a kind of back plate (the black strip, which I didn’t need because of my plastic reinforcement), and instructions (not pictured):
In my earlier post I showed you a paper scale model I made. I was pretty happy with this, so I decided to make a full-size paper model. To know how large I wanted it to be, I used my Filofax Metropol Personal as a guide. I currently use this model (with 25 mm rings) and wanted to make some minor alterations to this design for my own organiser:
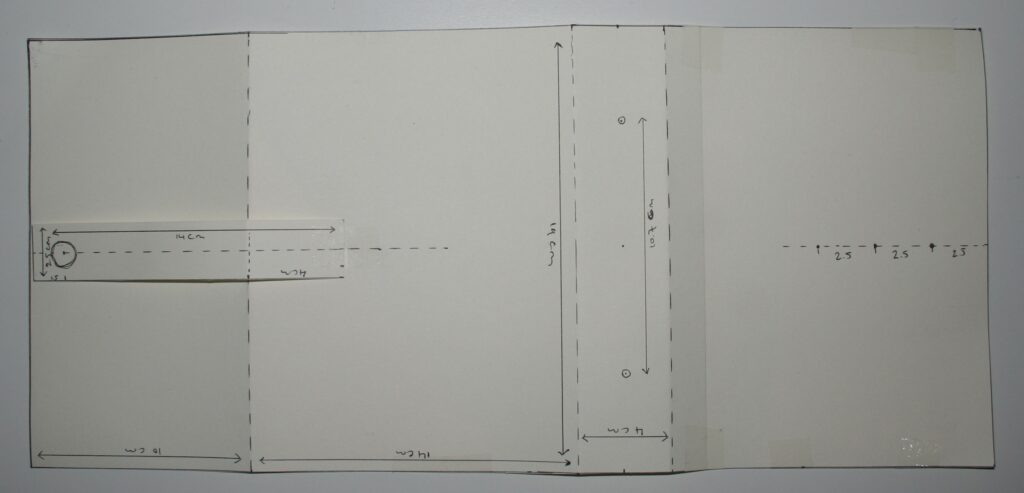
On the left we see the ‘flap’ that will cover the long edge of the contents, then to the right of it we have the back panel, then the spine, and the right panel is the front panel. Note that I ended up making the organiser 19.5 cm tall instead of the 19 cm shown in the paper model. This is because after I placed the ring mechanism on my paper model I realised I wanted just a little extra vertical space so no part of the ring mechanism would be right at the edge of the organiser cover. This also illustrates that it paid off to spend the time to make this paper model, as I would not have realised I needed 19.5 cm without having made such a model.
I had ambitions to create internal pockets:
However, once I stared sewing, I realised the material was a bit challenging to work with (thread tension, to get it right the first time, etc). So, for this first try I decided to just make a minimum viable model and abandoned the pockets so I wouldn’t have to sew through 3-4 layers as often (I have since figured out another way to make pockets, see the end of this post where I write about my lessons learned).
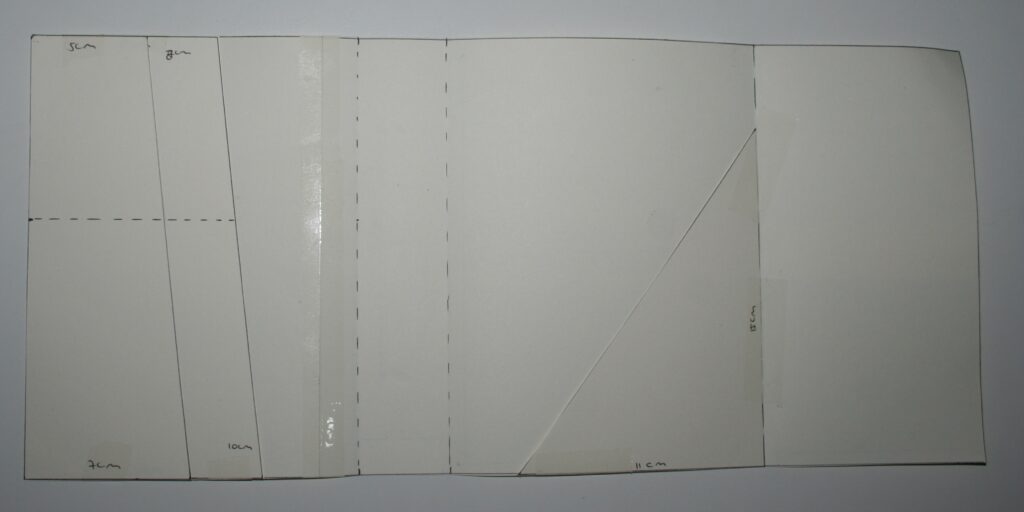
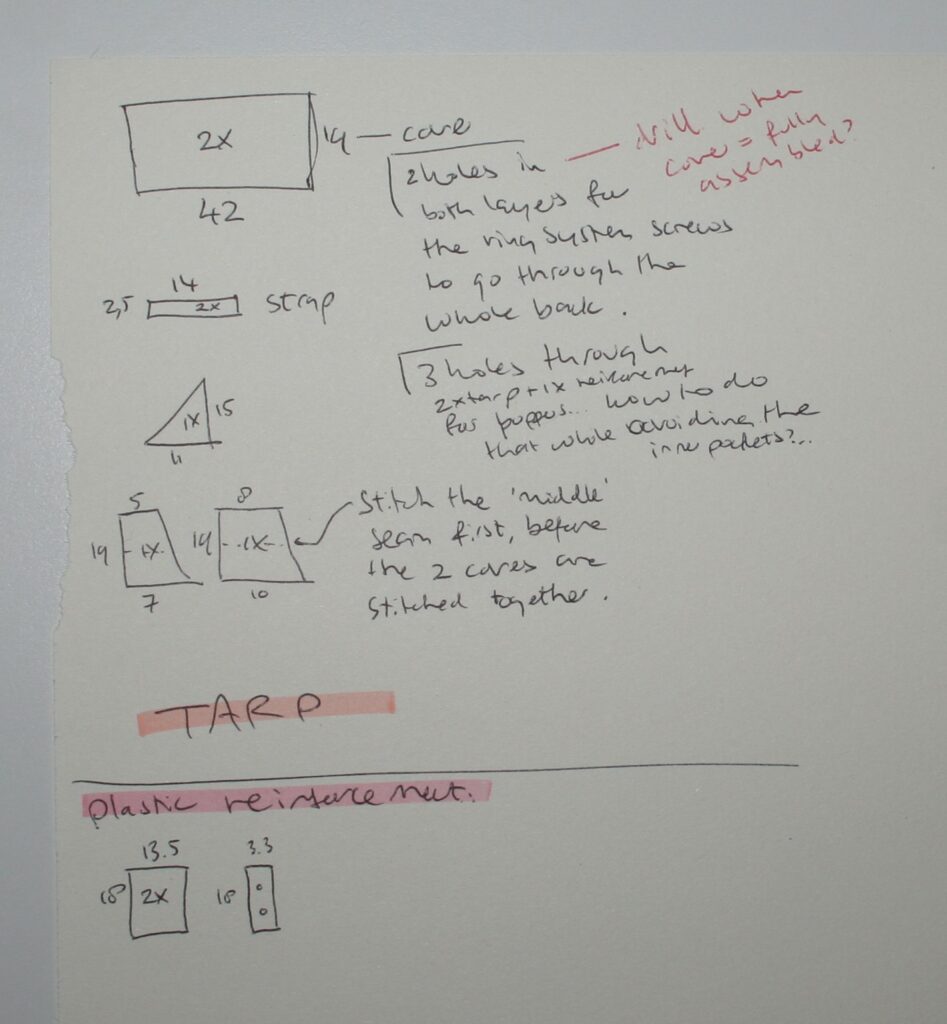
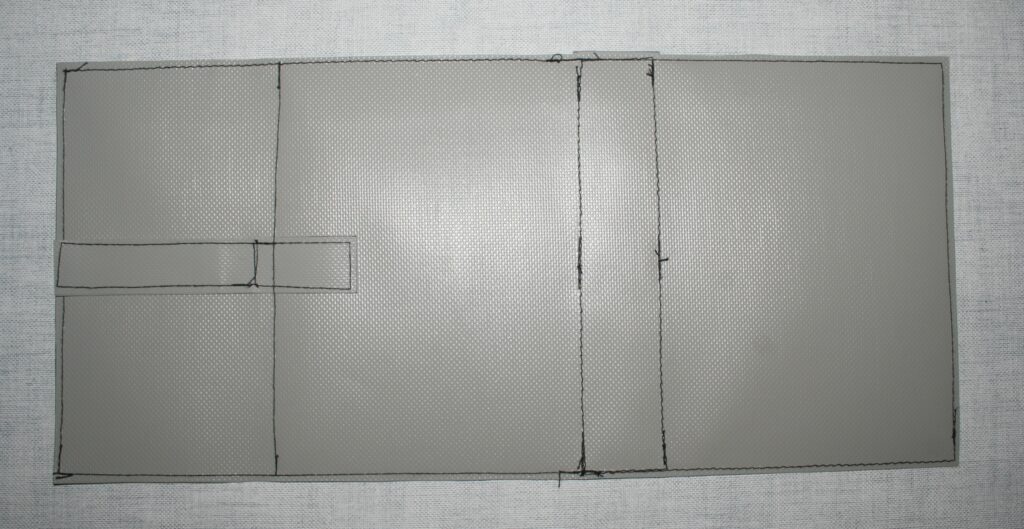
To help me organise, I made a schematic drawing of all the pieces I’d have to cut (this was when I still had plans to make the pockets; note that the ’19’ measurements all became 19.5 cm, and the ’18’ became 18.5 cm):
Take a look at the tarpaulin material as it arrived with the edges finished:
There’s two sides to the tarp, they are different: one side is matte and kind of ‘soft’ ‘buttery’ in texture (top/right); the other side is ‘smooth’, ‘bubbly’, ‘shiny’ and ‘plasticy’ in texture (bottom/left):
I like the ‘bubbly’ side so decided to use that for the visible sides, this means that I drew out all the pattern pieces on the ‘matte’ side (the side that would be hidden). You must be very exact with this because if your angles aren’t exactly 90 degrees or some pieces are slightly longer than the corresponding pieces they need to be stitched onto, you will struggle to make it all work. So, invest the time to meticulously draw your pieces and then when you assemble it all, everything will fit perfectly.
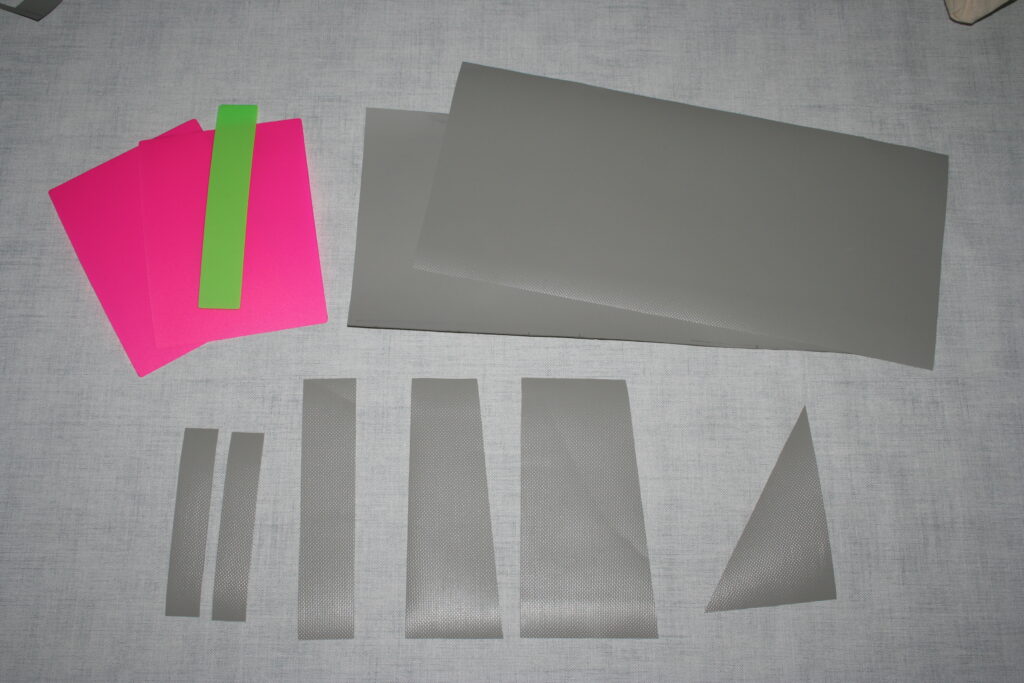
I cut out the tarp pieces as well as the plastic reinforcement pieces. For the latter, I cut slightly rounded edges as I didn’t want a sharp corner damaging the tarp or stitching. I cut the plastic pieces 0.5 cm or 1 cm smaller than the organiser panel piece in which they would sit (see doodle of all pieces above), assuming I would be stitching about 4 mm from the edges etc. Here you can see the plastic pieces on top of the tarp:
Below, you can see all the tarp and plastic pieces (note that I decided to not use the pocket pieces). The strips bottom left are for the closing strap, and the long strip next to it is reinforcement for the inside of the outer shell (where the spine would be) as I worried that one layer of tarp on which the screws would sit would be too little. I think that now I would perhaps omit that strip as the screws can’t pull through the tarp because of my plastic reinforcement.
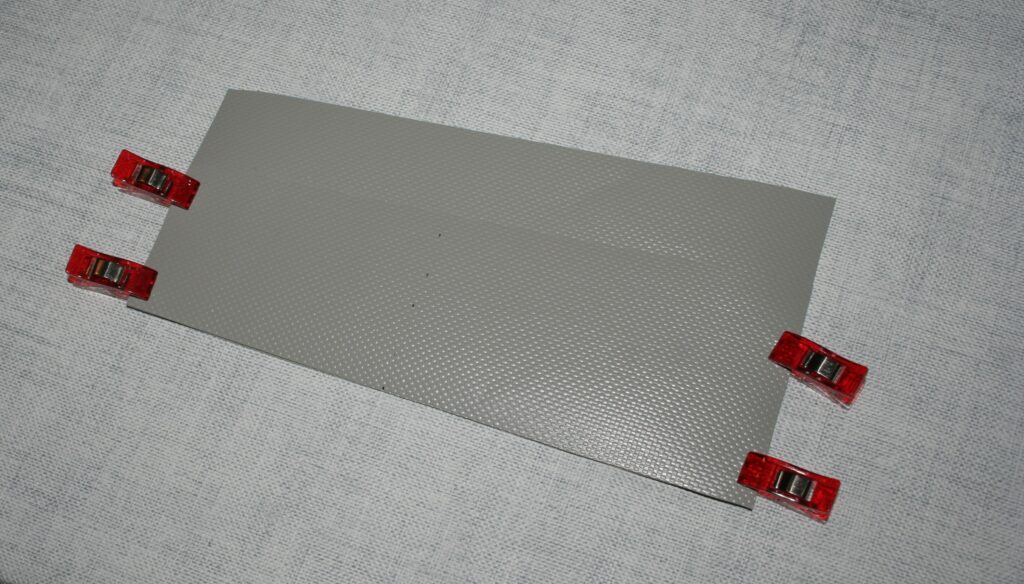
I used the clips to hold two pieces of tarp together whilst sewing but paper tape worked really well too, so you can choose either (these are the two pieces to create the internal pocket on the front cover that I ended up not using):
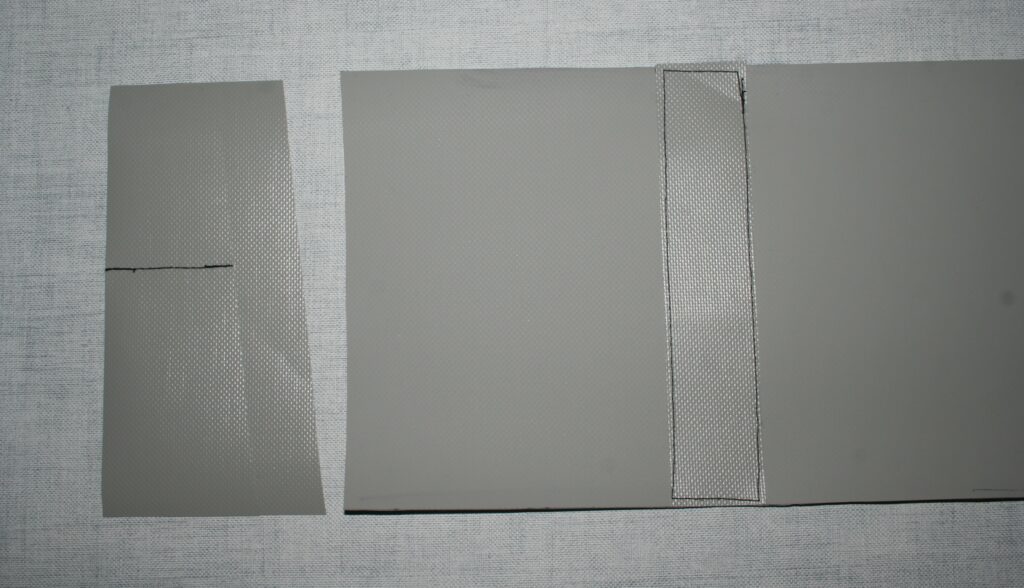
The first stitching I did on the internal pocket for the front cover as well as the strip to strengthen the outer shell of the cover at the spine (note that you are looking at the ‘inside’ of this outer shell, hence you are looking at the ‘matte’ side of the tarp):
I then placed the piece that forms the inner part of the cover (inner shell) on top of the piece shown right in the image above (the outer shell, seen from the inside) and stitched from the top spine to the top left corner, down to the bottom left corner, and then to and past the bottom part of the spine.
In the image below we are looking at the outer shell of the cover (shown upside down!) and we can see the stitching that attaches the spine piece to this outer shell, you can also see the stitching around the outer edge of the part on the left. I inserted the plastic piece into this stitched part of the cover shown on the left, which will form the front panel of the organiser:
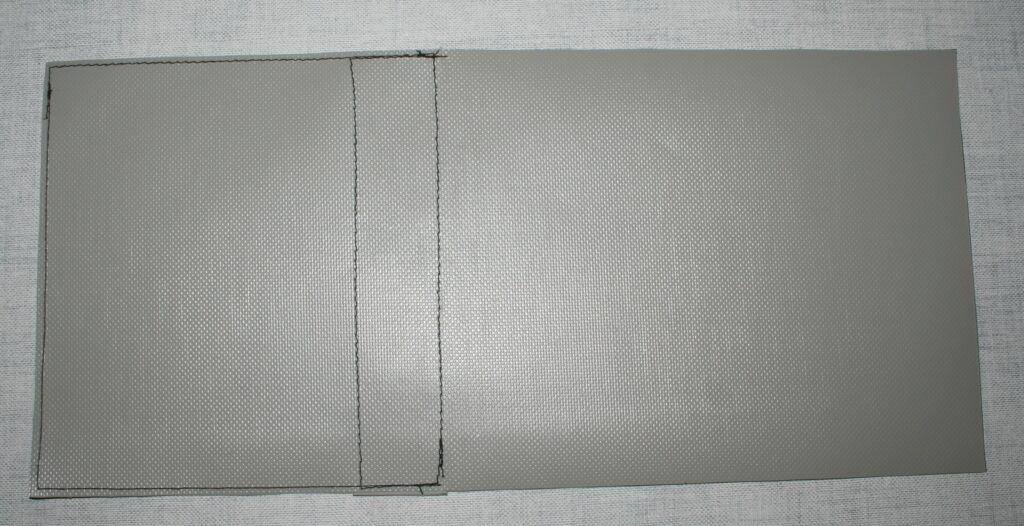
Because I had stitched along the whole spine piece to secure it to the outer shell of the cover, I already have this long stitching showing. I didn’t want to stitch over it again to secure the plastic reinforcement pieces in place because then the tarp is punctured twice on the same trajectory possibly weakening it and I’d have two lines of stitching there whereas everywhere else I’d have just one line, so it would look odd.
So, I just did three short bits of stitching for this (at the red arrows shown below, where you can see two lines of stitching on top of each other). Note that a plastic reinforcement piece is inserted into the part shown on the left and also a piece into the spine part. These reinforcement pieces are secured in place separately (each into their own ‘pocket’) so these plastic pieces can’t slide into another part of the organiser:
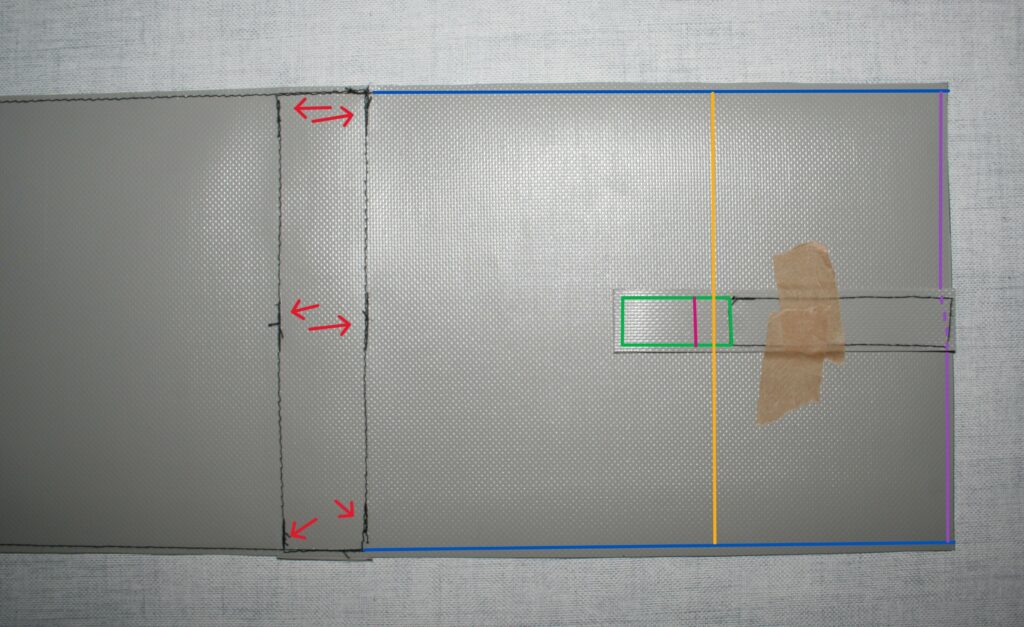
I taped the strap piece into place (this strap is made of two pieces of tarp stitched together for part of their surface, the black stitching shown in the image above) and you want to stitch the unstitched area of the strap to the outer shell of the cover only (so NOT through the inner shell of the cover), along the green line in the image above. I made a miscalculation when deciding on the strap placement (I accidentally didn’t follow my own paper model closely enough for this!). So, when I had attached the strap (green stitching), I stitched along the two blue lines through both the outer shell AND the inner shell, inserted the plastic reinforcement to the panel with the strap (which will become the back panel of the organiser), and stitched this reinforcement into place along the yellow line going through the outer shell AND the inner shell. Due to my earlier mistake, the stitching along the yellow line is further in towards the spine than where the small vertical stitching line is on the strap (the right vertical line of the green stitching), and I could not avoid also stitching through the strap. This is not as intended, as I had intended for the stitching that attaches the strap to the organiser to end at the pink line, but that’s what you get when it’s already late but you really want to finish! Finally, I stitched the right edge (along the purple line): do NOT stitch though the strap, just keep the strap away from where you are stitching, use tape if that helps.
And that’s all the stitching done!
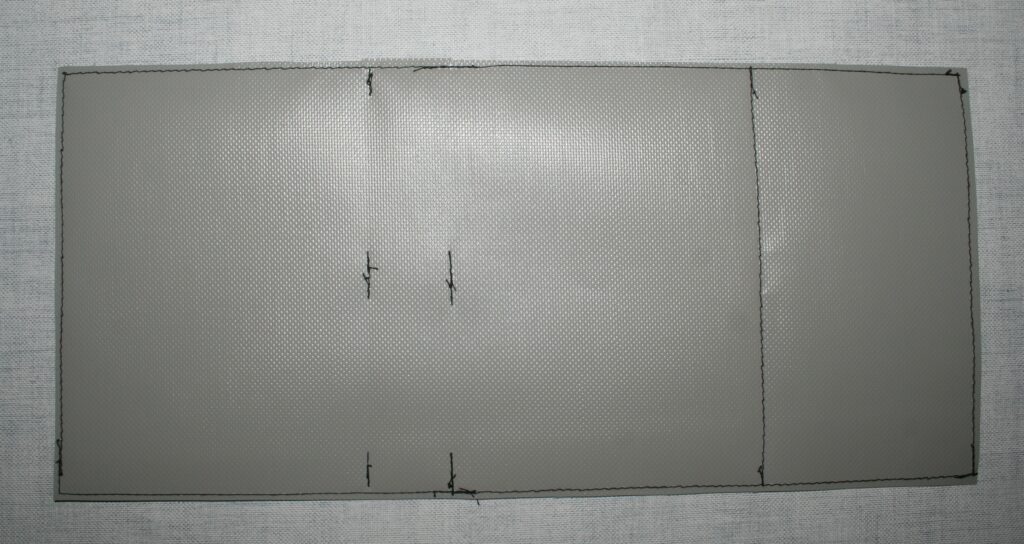
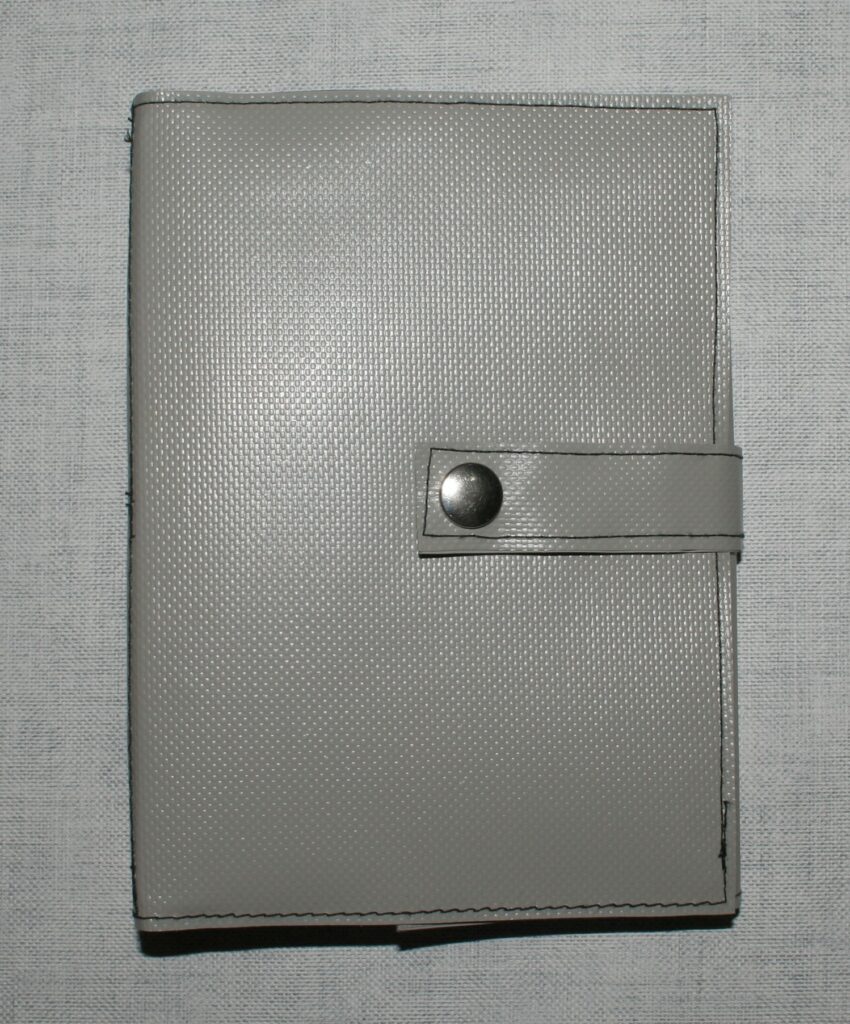
View of the outside (outer shell of the cover; right way up):
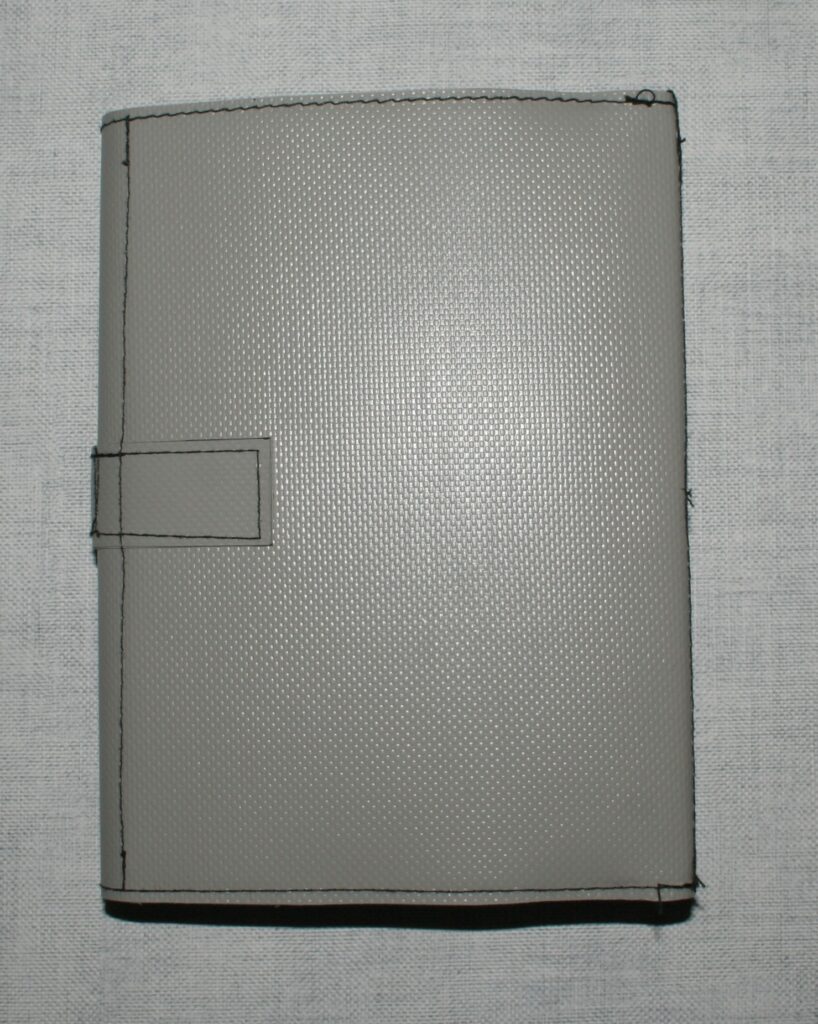
View of the inside (inner shell of the cover; right way up):
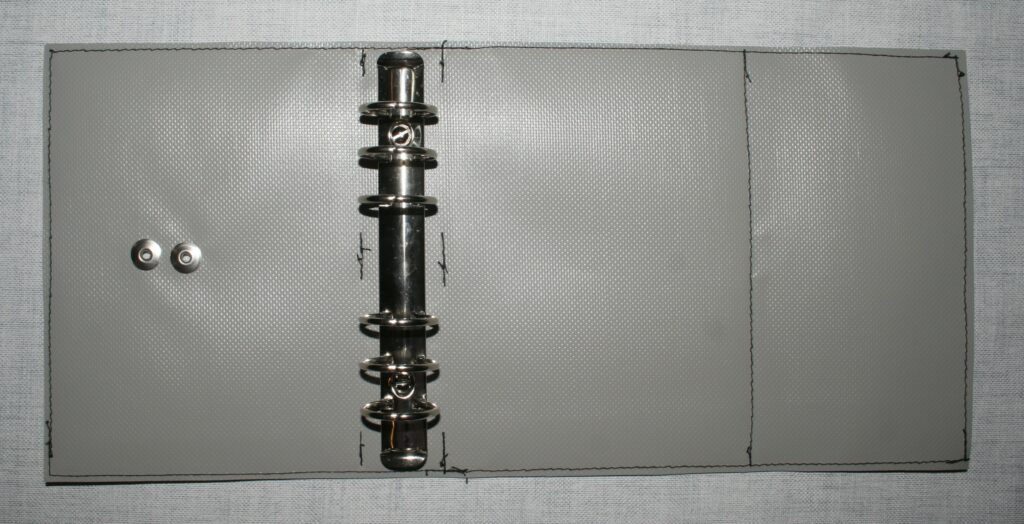
On the inside we can see the front panel on the left, then the spine (note the three small sections of stitching on either side of the spine), the back panel, and then the ‘flap’ that protects the long edge of the organiser contents.
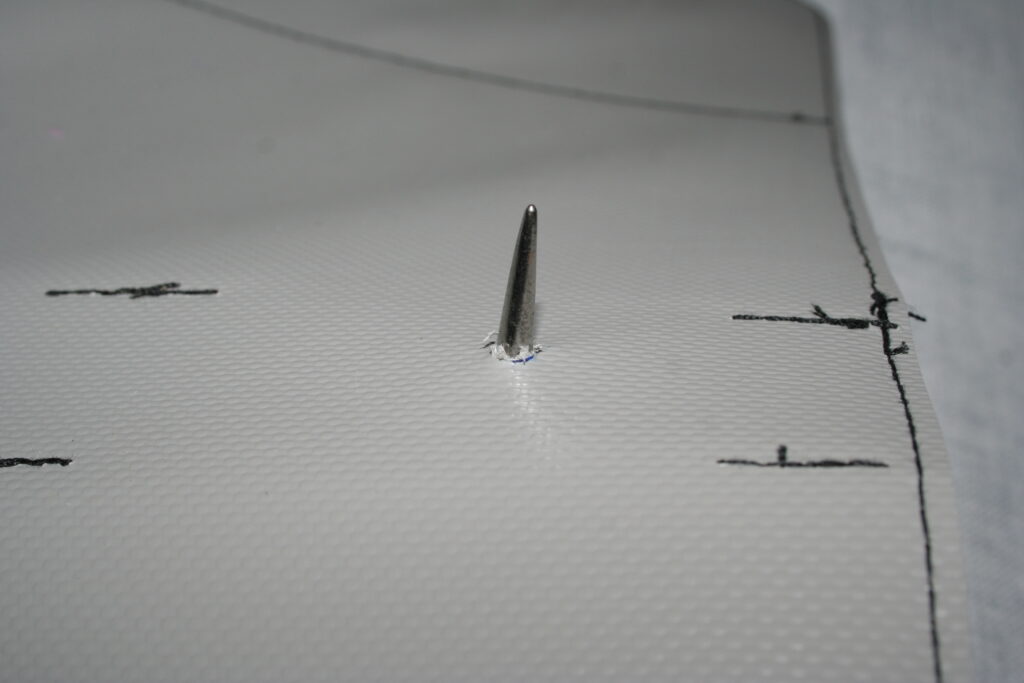
Now we want to attach the ring mechanism, so we need to use the drill (don’t forget about your goggles and ear plugs/defenders)! I had contemplated using the hole punch for the tarp and the drill for the plastic reinforcement and doing this all BEFORE stitching everything together. But I was worried that somehow such holes wouldn’t exactly align once all pieces are attached to each other, and then what? Then you still have to drill to get an aligned hole, but now you’ve made some of the holes larger than intended, which can cause its own problems (loose fitting press studs; you could end up pulling a screw right through the material if the hole is too large).
I used a 2 mm drill bit first and then a 3 mm drill bit. I think this was still too small for the female part of the screws for the ring mechanism, so I ended up using a 4 mm drill bit for that. I used a small piece of approximately 2 cm thick MDF board to put my organiser onto for drilling so I’d have something to drill in to go all the way through my organiser.
Drilling wasn’t ideal for the tarp as the tarp was basically cut instead of a hole taken out. That’s where a hole punch would have been great, but the hole distance is too far in for the hole punch pliers to reach and the plastic reinforcement is not a good underlayer for punching holes onto. So, even if my pliers could reach, it may not have been able to cut through the tarp. I usually use a little bit of card as an underlayer when using the hole punch, but that’s not possible here. Another issue is that the little bits of plastic drilled off as well as some of the MDF dust seemed to have ended up in between the layers of my organiser and I couldn’t get it all out (I did use the vacuum cleaner to clean around/over the holes). This would be prevented by making all the holes BEFORE stitching the pieces together as you can then clean off all the bits and dust.
Here’s one of the holes I made for the ring mechanism, you can see the MDF dust and green pieces of plastic from the plastic reinforcement:
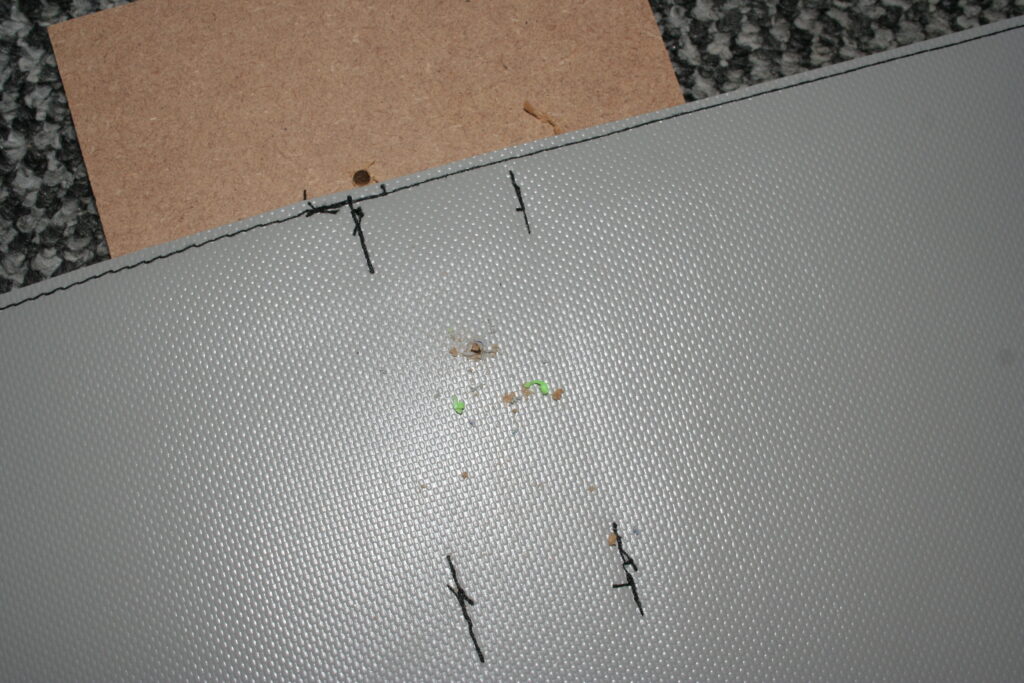
I used an awl to make the hole slightly larger and used a blade, aimed at cutting onto the awl, to try to cut off excess tarp:
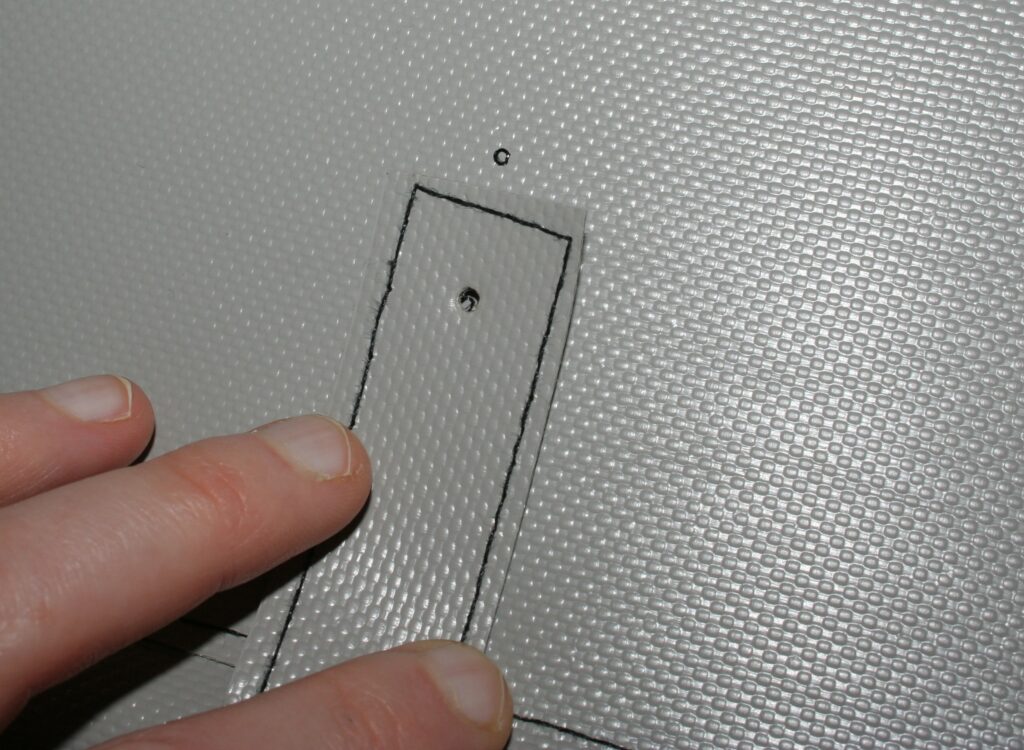
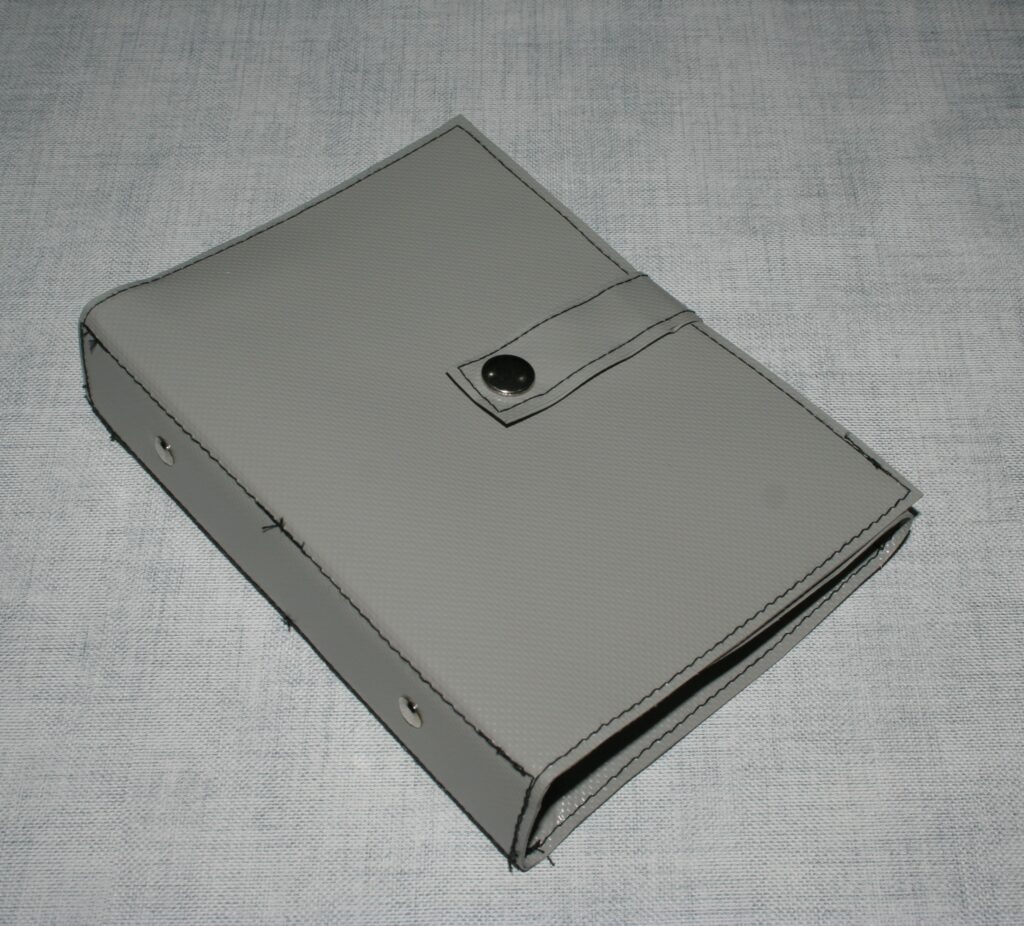
It was much easier to make a hole in the strap as here, I could use my hole punch pliers (using a little card underneath the material to punch through). I think I picked the 2 mm diameter punch. After making the hole, I closed the organiser perfectly so the top/bottom are exactly aligned around the whole organiser. I used my marker to draw out where the holes would have to be on the front panel, for the popper studs:
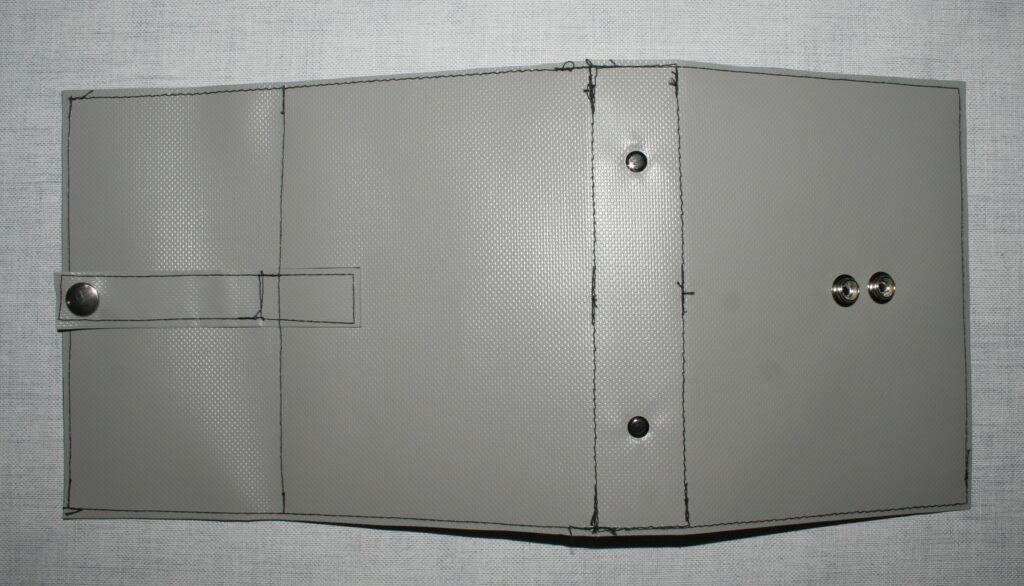
I drilled these holes, I think with the 3 mm drill bit. I then attached the popper studs using the small tool that comes with the pack, using a hammer on a solid floor. And now my organiser was completed!
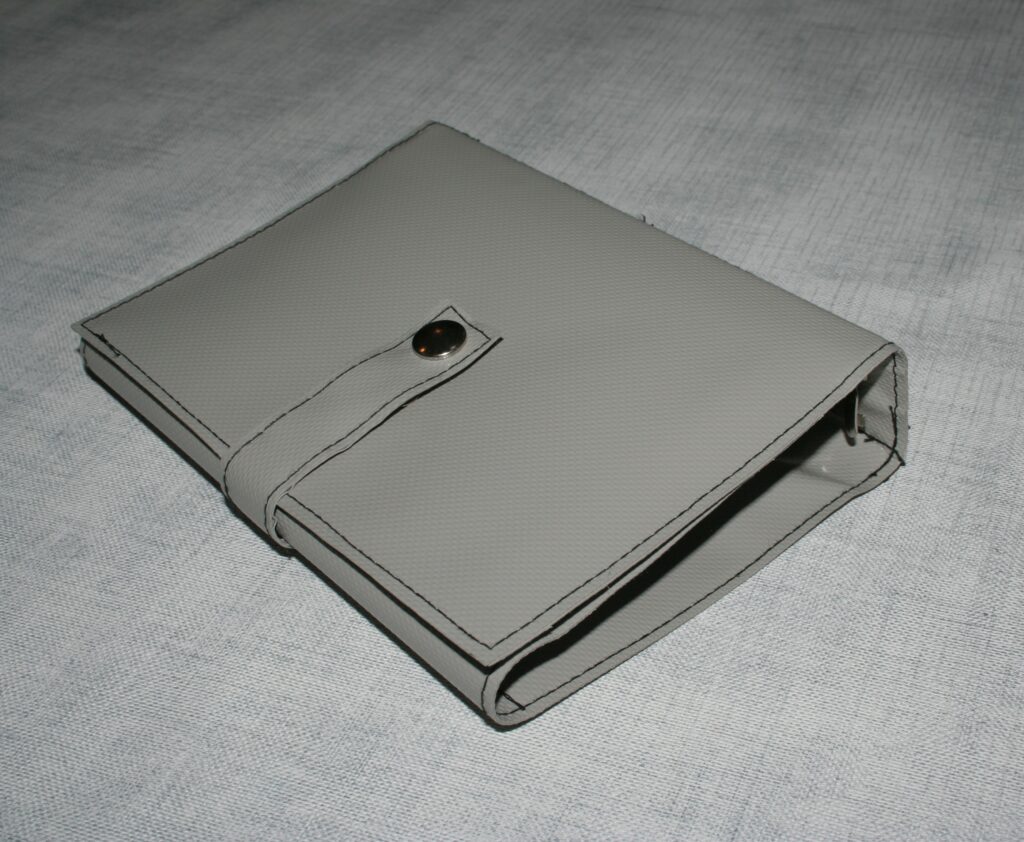
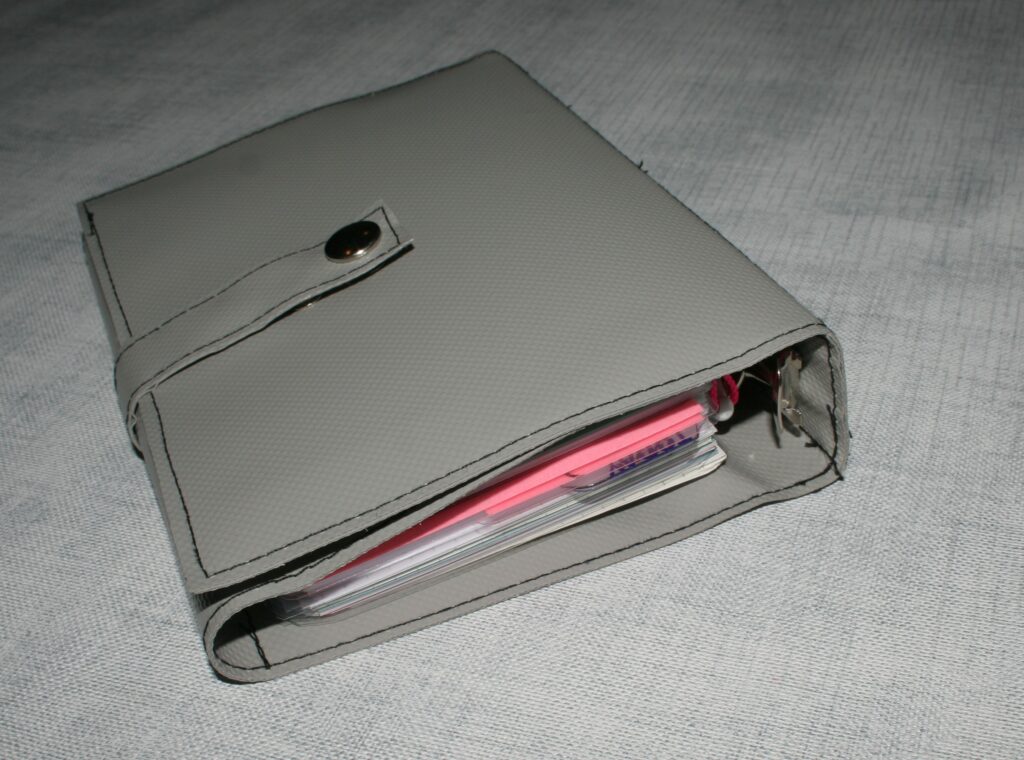
The result:
And with the contents from my Filofax Metropol Personal (25 mm rings), with still plenty more capacity in these 30 mm rings (note that with these larger rings, I can leave my thick pen in the rings and still easily flip through my organiser contents, this was not possible with the 25 mm rings):
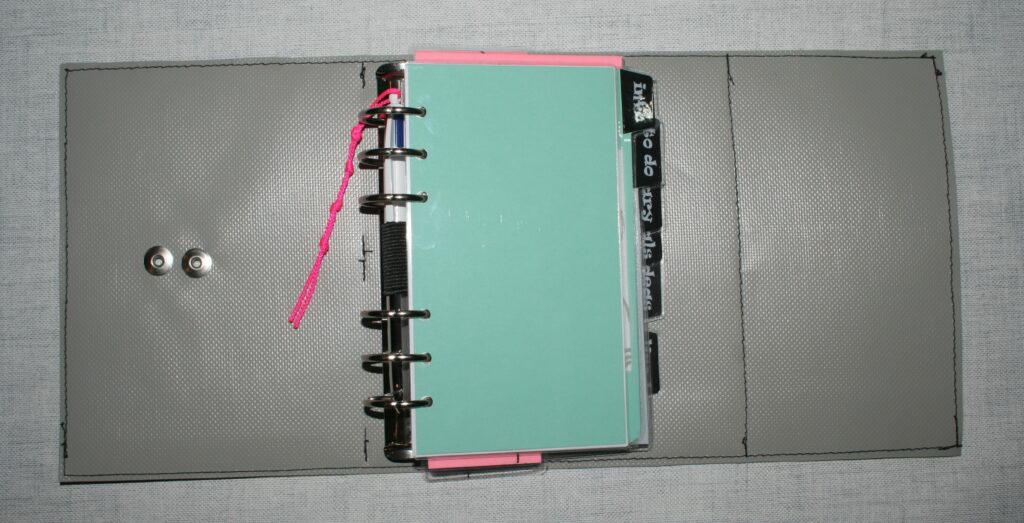
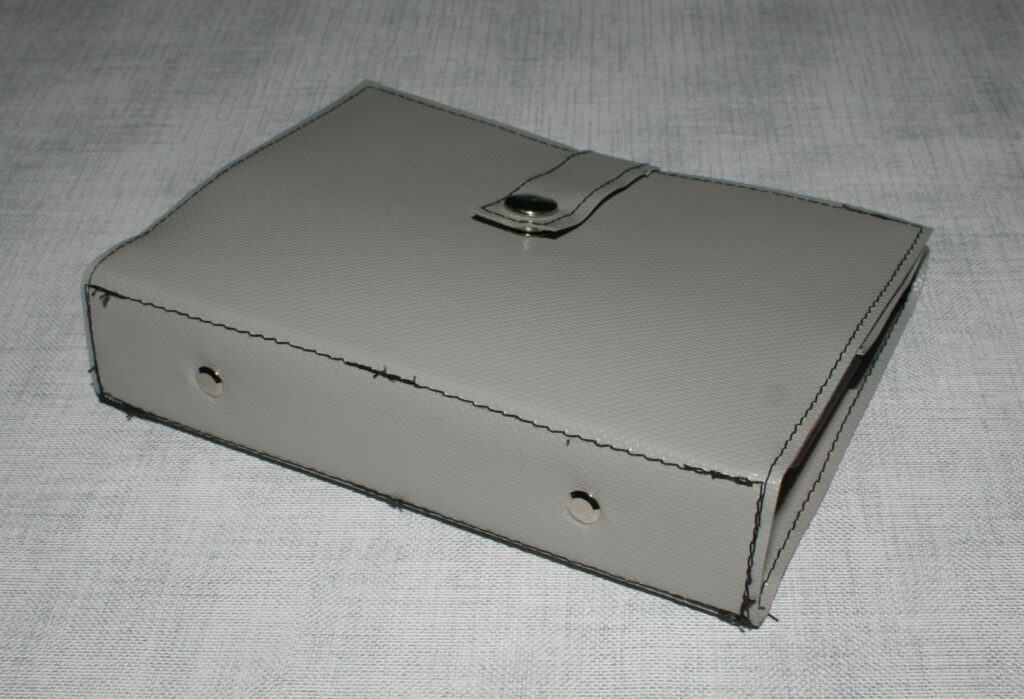
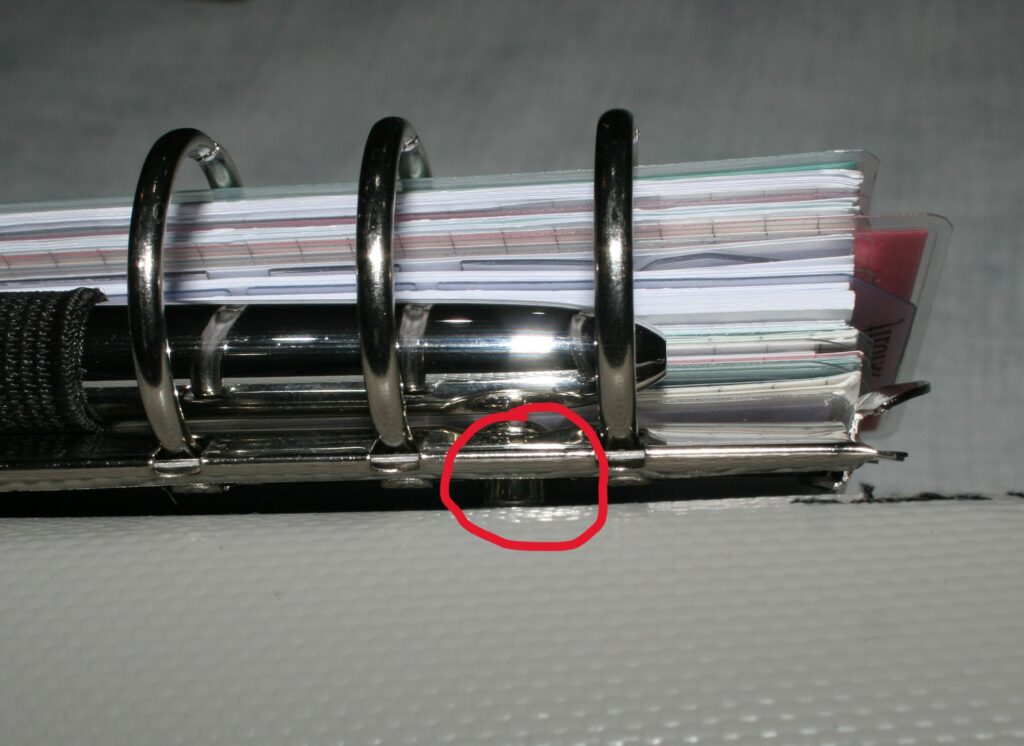
It’s hard to see, but inside the red circle (image below) you can see a little bit of the stem of the ring mechanism. It’s not possible to make this tighter as it’s part of the fixed metal piece. I think this is perhaps because most organisers are thicker/puffier so they need this extra space (even though I already used the shortest male part). I don’t think it interferes with use, though:
Phew, that was a fair bit of work, especially writing it all down ;).
So, some of my lessons:
- Ensure that if you have a paper model you are happy with, that you follow it exactly. This went well for me except for the placement of the strap, as described above.
- Somehow the two press studs on the front panel are not exactly horizontally aligned… I used the strap as a guide, but I should have just measured it out instead.
- I don’t know whether I need that tarp strip to reinforce the spine. If I were to do it again, I would not stitch around the whole of this strip in the initial attachment, but perhaps just the top and bottom (short edges) or even use two small pieces of double-sided tape or a little bit of glue (avoiding the areas where the holes would be drilled or where I would stitch) so that I then can do a full length of stitching when stitching the plastic reinforcement into place (as opposed to the three bits of short stitching I did this time). This, because I really want to avoid having to stitch over the exact same bit more than once (for strength reasons, and cosmetic reasons).
- Including the pockets would require me to stitch through 3 and even 4 layers of tarp and that seemed to be a challenge for my domestic sewing machine. This is why I abandoned the pockets for this first attempt. I am a bit sad now that I don’t have pockets, especially as after I was already too far in I figured out how to avoid/alleviate this issue, namely by stitching the pocket a little further away from the edge, so it’s attached on its own instead of as part of the edge stitching:

- The way I constructed this organiser it sort of wants to fall open as there’s ‘tension’ on it. I think this is due to me ‘wedging’ the plastic reinforcement in fairly tightly (by stitching through the tarp very close to where the reinforcement plastic edge is). I will solve this a next time by creating a ‘hinge’ bit on both sides of the spine: a thin area without any plastic reinforcement (the blue bits represent the plastic reinforcement):
- As I made this organiser flat, with two layers of tarp, when I fold the organiser shut, the inner shell buckles somewhat (this also happens with the strap). Filofax manages to avoid this by, I guess, stitching the material over a curved surface so it holds it’s curved shape (like the strap of my faux leather Metropol, but then it won’t lay flat…). I don’t know how to do that. It’s a minor issue and something that I think will at least in-part be solved when I include ‘hinge’ sections next to the spine (shown above). The advantage of this, though, is that my organiser lays fully flat when opened.
- I might not need 3.3 cm wide plastic reinforcement for the spine as it makes my organiser quite thick/boxy. However, compared with some of the floppier Filofax organisers, at least my cover isn’t ‘resting’ on the spine where it could ‘sink’/’sag’ into the space between the rings (like my Filofax Malden). So, I think I may only reduce this plastic reinforcement to 3.0 cm.
- I am not sure how to solve the issue of having to drill holes through the whole organiser. I don’t like having the little bits from the plastic reinforcement nor the MDF dust creeping in between the layers of my organiser. But as said above, I worry if I make all the holes before assembly, that I will find these holes don’t line up perfectly and by then it’s kind of too late or you have to make some of the holes larger (and by then all you can use is the drill so you will still have some of this debris).
- I wonder if I should have used a different needle as when the needle moved upwards, I felt the tarp kind of ‘pulled’ on it/the needle pulled the tarp up a little. Maybe a leather needle would have worked better (but they make tiny slices in your material so that might damage the tarp…). Something to try on some scrap piece soon.
- Finally, on my strap, the direction of the ‘bubbly’ pattern is at a 90 degree angle to the rest of the organiser: I didn’t pay attention to this when cutting out my pieces. It’s only a minor cosmetic thing, most people probably wouldn’t even notice, but I notice! So, in the future, I will make sure to cut out the strap horizontally in relation to the other pieces, as that is how the strap will sit on the organiser.
OK, I think that’s everything!
Although not perfect, I am pretty happy with how this turned out especially for a first try. I have a lot more tarp (the smallest piece I could order was 2 x 1.4 m) so I can try several times again and undoubtedly next attempts will be better.
I think this is a great project if you have some craft skills already and if you want to make a unique design for your organiser. Maybe you always wanted certain pockets with a certain ring size and you can’t find this anywhere. Maybe you want to use a special material. Maybe you just like making your own things :).
Best of luck, and please do leave comments with any tips, questions, and suggestions. Thanks for reading!
Oh, and I want to shout out to this blog post where the writer shares how they made their own rings organiser. This was a good help to get some tips before getting started!
That’s so cool and useful. Thanks for detailed explanation. You should definitely create videos about your projects.
Thank you! I will hopefully get to this early next year :).